OneNote
Throughout your study and professional career, you will be collaborating on various projects with others. This will involve co-editing, giving feedback with comments and working through different revisions of documents.
Google Drive and OneDrive are two of the biggest names in cloud storage. Each provides not only a useful way to free up hard drive space by storing files in the cloud but a range of features and integrated applications that make them ideal for getting work done.
All students currently enrolled at the University of Auckland are eligible to use Office 365. To find out more visit the IT Essentials page for further information on:
Comparing Microsoft OneNote to Google Drive
Why use OneNote?
OneNote was designed specifically to eliminate the need for paper.
The platform is brilliant as a collator of information coming from multiple different sources:
- clippings from websites
- voice recordings
- videos
- documents
OneNote is a digital notebook that automatically backs up to Microsoft Office 365 cloud.
Microsoft has developed apps for every device including:
- Windows PC
- Mac
- iPhone and Android.
OneNote notebooks can be shared with classmates for real-time collaboration.
Be aware that using OneNote 2016 on a Windows computer offers more features than on iOS, and even less are available on a mobile device app.
OneNote has rich editing tools that let you format text, add pictures and tables to each page, attach files, draw illustrations and link to other OneNote pages.
What is OneNote?
OneNote is essentially a three-ringed binder
- Notebooks
- Sections
- Pages
Notebooks are the main files for OneNote that hold all pieces inside. You may create separate notebooks for items like Work, School, or Home.
Sections are the dividers in the notebooks and the next levels in the hierarchy. You might label them like in a College notebook as Chemistry, Psychology, and Math for each of your classes.
Pages are within the sections as the notes, lists, and planners. Using College as an example again, your Psychology section may include pages for Lecture Notes, Study Questions, and Homework Assignments.
It is a tiered organisational system, and by default, you’ll start off with one notebook but you can create more.
OneNote is a digital notebook that automatically backs up to Microsoft’s Office 365 cloud. OneNote notebooks can be shared with colleagues for real-time collaboration.
Group projects don’t happen in a vacuum. Collaboration is key, and your team should be comfortable with the tools being used to reach the collective goals. Therefore, getting your group proficient with OneNote is key.
OneNote app vs web browser
Microsoft OneNote Online lets you take notes and organise note pages in a web browser. For more advanced editing features, use OneNote Online’s Open in OneNote command.
When you save the notebook in OneNote, it is saved on the website where you opened it in OneNote Online.
The notebook you open in OneNote Online is the same as the notebook you open in the OneNote desktop app, but some features work differently in the two environments.
Differences between using a notebook in the browser and in OneNote.
Do your own experimentation within your own group and availability of devices to find the best version of OneNote for you.
Organising your OneNote
It is best to consider how you will be using your OneNote with your own personal studies, as this will determine the best file structure for you.
Some suggested ideas that you may wish to consider:
- Set up per semester:
Have a notebook per semester, and then a section per class and then each page for a lecture - Set up per course:
Set up a notebook for each class, then sections for lecture notes, homework, and class info (syllabus, schedule, links to class sites, etc). - Use only one notebook:
Keep it all in one notebook. Each course subject in a section group. Each course in the corresponding section group in its own section. Then lectures, labs, projects, etc. on their own page (or nested pages if need be).
You don’t have to save your notes, as OneNote does it automatically. It’s only when you need to save a notebook, page, or section, under a different name, you need to use the Save As… function.
Setting up and sharing your OneNote Notebook
Setting up your OneNote Notebook
How you set up your Notebook will depend on your OneNote.
Step 1. Sign in using your @uoa.auckland.ac.nz email address
Step 2. Select New Notebook
Step 3. You may be prompted here to sign into your OneDrive account, sign in an created folder
Step 4. Name your OneNote
For further information on Creating a notebook in OneNote
Sharing your OneNote Notebook
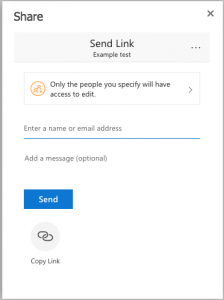
Share your Notebook with other people.
This will look different depending upon if you are in the web browser, app, mobile device and if you are using iOs or Windows.
You have an option to allow editing permission for the people you are sharing the NoteBook with. If you want to provide ‘read-only’ access, uncheck the ‘Allow editing’ box below.

Enter the email addresses of people in your group. Ask them to collaborate with you and enter their favourite food and activities for each season.

OneNote features
Password Protection: OneNote is designed to help keep your notes safe from prying eyes. When a section is password-protected, all of its pages are locked until you enter the correct password.
Right-click the section tab you want to protect and then choose Password Protect this Section.
- In the Password Protection task pane, choose Set Password.
- In the Password Protection dialogue box, type the password you want into the Enter Password box.
- Confirm the password by typing it again into the Confirm Password box, and then click OK.
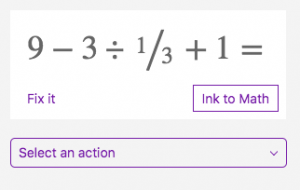
Ink to Math
Using the pen tool with iOS.

Write your equation with the pen tool. Select the equation using the Marquee Select tool.
![]()
Select the Math button

Depending on the equation, it may also be able to supply you with further explanation around how to solve the equation.

Windows
Select Draw and select Ink to Math.
Write your equation in the yellow box provided.

Tags
On the Home tab, you will see the section called Tags in your ribbon. When you click the arrow in the Tags box, you can view a complete list of the built-in options. From simple prioritization to follow-ups to ideas, books, and movies, you can choose from a nice selection.
Add a tag
To add a tag, do the following:
- Place the cursor at the beginning of the line of text you want to tag.
- Click Home > Tags, and then click the icon of the tag you want to apply.
Custom Tags (only available on Windows)
Tags are used to mark items in your Notebook. The pre-defined tags include To Do, Important, Discuss with Manager, Website to Visit. You can create your own custom tags to identify and search for key information.
Create a Custom Tag
1. On the Home tab click the tag drop down arrow
2. Click Customise tags
3. Click New Tag


